Monday, June 18, 2012

How to make the stretched star

As you can see I've finished all my blocks.
My next step was to put them on my table in columns, because I had only 7 blocks of each color I made a slight change in size, and had 11 columns each 7 blocks long.  If you have 90 blocks you will want to lay yours out in 10 columns 9 blocks long (10 x 9).  I first tried a "scrambled" look with just putting them all out in any order.  It didn't work so I decided to try a diagonal order, which worked much better.  My diagonal went from upper left to lower right.
Once you have your lay-out decided, put a safety pin in the upper left hand corner of the top left hand block in each column across. This will help you orient the blocks after you have sewn them.

Now flip the top right hand block over the left hand block.

Take these to your machine and being sure to keep them in order sew down the right edge making a 1/4 in. seem allowance.  Do not cut them apart, just keep right on sewing on the next two blocks. This is called chain piecing.  It saves time, thread and helps keep the blocks in order.

Once you have finished your whole column of blocks, lay them back down on your table and flip them open to lay flat.  Use your safety pin in the upper left block to orient each column correctly.


You will notice there is a small chain of thread holding each pair together in the column.  Now take the first column to your sewing machine.  Flip the top 2 blocks over the second 2 blocks and matching edges and center seem, sew them together.

Your chain of blocks will be out to the left of your sewing.


In this picture the top 2 sets of blocks are sewn together. Keep flipping the sewn blocks over the unsewn ones and always matching the center seem, sew them together. Sew each column like this.  You will have 5 double columns each 9 blocks long , if you are doing a 10 x 9 block quilt. I had 5 double columns and one single, each 7 blocks long for my 11 x 7 quilt.

Again I like to lay out my double columns out on a table (or floor, or bed or wherever you have space)  and still using the safety pins to keep them in order, check to see that everything is lined up the way you want it.  It is much easier to fix things now because our next step is to sew them all together.


And here it is, the finished lap quilt. I chose to put a border on mine of the same fabric as I used for the corners.  I feel this works well and helps to hold the whole quilt together.  After I layered the top, batting and backing together I machine quilted this one on the diagonal down the center of each large block. 

 I can see this quilt in many different colors and sizes and I'm sure I'll make it again.  Wouldn't a shorter one done in the flat block be a great baby quilt? 

Any questions or comments, please leave them and I will be glad to answer them.
Chris


Tuesday, June 5, 2012

Stretched star beginnings


More on Stretched Star...


So all of the fabrics are cut and now it's time to decide what  method  to use to make the block.


Read all of these directions before deciding.


 I have 2 choices, either the flat corner block or the pocket corner block (my names for them).  Both look very similar, but are made in two different ways.  Above is a sample of them.
On the left is the pocket block, in the middle is the flat block and on the right are the 2 extra mini-squares you get if you do the flat block. These mini-squares are not used in this quilt.

The flat block takes more preparation time, in that it has to be marked on the wrong side. The pocket block takes more sewing time, it has to be basted onto the large block, but this may be done by machine. I'll show both methods, first the flat block.

To make the flat block first mark the wrong side of the smaller squares diagonally across from corner to corner.

Then mark again 1/2 inch away, this line will not go from corner to corner, but is parallel to the first line.

Then you may mark a dotted line in between these two.


Next place two of these squares on opposite corners of the 6 inch square, right sides facing, as shown.


Now sew along all four of the solid lines, (2 lines on each of the smaller squares).

Next cut along the dotted line.  If you did not mark this line you may measure over 1/4 inch from the first line marked and cut there. Press the two corners open.

This large block should measure 6 in. square. The 2 smaller half triangle squares will be 2 1/2 in. square.  These smallest squares are extras and are not used in this quilt.  You may save them to use in a 'doll quilt'.  If you don't care to save them, then don't bother to sew the 2nd line (the one that does not go from corner to corner) on the small square, simply trim off the corners and toss.


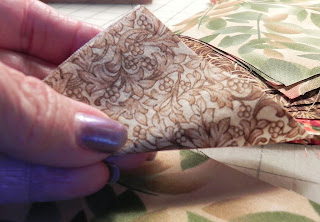
To make the pocket corner block, start by folding the small square in half diagonally, wrong sides together.


Then place them on the 6 inch square in opposite
corners.


Sew these corners down very closely to the edge of the square.  You want these seams to be within the 1/4 inch seam allowance.  This may be done by hand and is a great take along project when you have free time.


The pocket block should look like this when finished.


So now decide which way...I'm doing the pocket block.  Get all the blocks done and next time we put it all together.

Saturday, May 26, 2012

New Project--Stretched star

I'm back...we were gone on a cruise through the Panama Canal on the Celebrity Infinity. A huge cruise ship, there was only 2 feet clearance on each side as it was going through the Canal.  It was really great, just to see the canal and Panama, plus we also stopped at Cabo, Puerta Vallarta, Punta Arenas, Coata Rica, Puerto Quetzal, Guatamela and Cartegena, Venezula.  Wow, all that and 15 days of cruise ship food and entertainment.  I'll do that again any time.
And when we got back we went to Tucson over Mother's Day weekend to see the Sonoran Desert Museum in full bloom and I visited some of my favorite quilt and yarn shops there. I got a great idea for a quilt from the Cactus Quilt Shop--Stretched Star.
 We also enjoyed Sonoran hot dogs.  If you haven't had one, try it at BK's.  Really good.
Then last weekend I celebrated my birthday, Mike took me to Rosie's Calico Cupboard, and then lunch at DZ Akins.  A little something for both of us.
So now I am finally in a position to start another quilt and Stretched Star seems great, so try it along with me.
It is a great pattern to use up scraps. It only needs 90 six inch squares for star centers (all scrappy), 1 1/2 yds. for the stretch corners and 2/3 yd. for outer borders (or 2 1/4 yds total for corners & borders).  This makes a nice lap quilt that is 55" x 61".
I have had this roll of autumn colored 6 inch strips for years since they are already 6 inches wide it seemed a no brainer. So I just need my star corners and borders and after a little stash diving and consultation with Mike we decided on:


It gives you a look somewhat like this:


So start picking out your scraps and cutting the 90 six inch squares.  The corner fabric can be cut in strips 3 1/4 inches wide then cut the strips into 3 1/4 inch squares, you need 180 of these small squares.
  If you want an idea of the stretched star take a look on my web site www.reesekesworld.com.  It is the first quilt on the Bed Quilts page.  That one is done in star fabrics and in very small squares pieced together, the one we're doing now is easier and will go much faster.  So happy quilting.  Chris

Wednesday, March 28, 2012

Value in color schemes for quilts

This blog is going to be a very short one. I just found out that they have finished the video of my ideas on color schemes for LibraryYOU at the Escondido Public Library. It's kind of fun and there's a lot of other interesting videos at this same site so check it out and let me know what you think of it.

http://libraryyou.escondido.org/commercial-color-schemes-for-quilters.aspx 


Value in color schemes


This is a shot of some watercolor quilts I did a while back but they give you a very good idea of my ideas about color schemes, especially when it comes to value in quilts. Value is the difference between light and dark and that can be very important in creating a vibrant lively quilt with lots of movement in it.


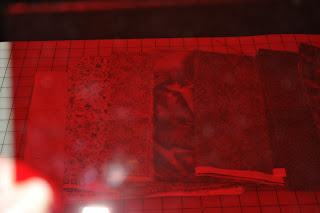
There are lots of ways of telling the value of a particular fabric. One of the easier ways is to use a value finder which you can buy at almost any fabric store. It's rectangular piece of red plastic you look through at your fabrics and it can tell you right away if it's light or dark. The one on the left is called a "Ruby beholder" the other is a piece of plastic I got at a quilt show.  Both each work well.


This is what you see, before and after through the red plastic.


 You can tell the value of a fabric easier when the color is  'not in the way'. 


So be sure to pick different values for your quilts and Happy Quilting. 


Chris
http://www.reeskesworld.com

Monday, March 12, 2012

Finished quilts

I finished off a lot of quilts this past week, (well 6 to be exact).  It is very easy for me to start on a new quilt top before I complete the current top.  So I got to work and although I planned, in my mind, a number of new quilts, I was able to finish my  top stash.
First I finished the Irish Chain :

Then I added boarders to the Autumn Virginia Reel, which I know made it look much better.

Next came the Medallion (the center is a Feathered Star) quilt and the Half Log Cabin, check out the back side of them.
The back of this one, the Half Log Cabin, shows one of my favorite things to do to back a quilt.  I use up as much of the left over scraps from the front as possible.  Sometimes I also use fabric from other quilts if I like the way the color goes with the top. Which is how I backed the Medallion and the Country Lanes quilts.
The last one I worked on was another Virginia Reel, which I made using the colors from the blueberry photo in Souplantation.


So this is what I did this past week, backing, tying, quilting, and binding these quilts.  It was fun and very satisfying when I finished them.  They are all for sale so get in touch with me at reeskesworld@gmail.com or reply to this blog. Also check out my website:   www.reeskesworld.com

Sunday, March 4, 2012

Make a quilt top in an afternoon or Irish Chain quickly

First pick a quilt pattern, an easy one if you want it done in an afternoon.   In honor of St. Pat we are doing Irish chain, pictured above.  This is an old well used lap size quilt, but it shows the pattern well and because I made this one opposite to the usual color placement (light for dark, dark for light) it gives you something to think about.

Next go to your stash...or fabric store and pick out some fabric you like.  For this Irish Chain (IC) I keep to one color and I made sure to pick fabric in the light and dark categories for good contrast. You can pick just 2 fabrics as I did in the blue one above, or since I wanted to use up some scraps and small cuts of fabric I picked a variety of prints.
I picked a number of prints and then thinned them down to the few light and dark ones I wanted to use.


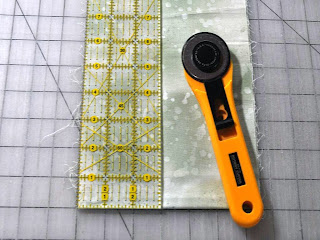
I cut a number of strips of light and dark at exactly 3 inches.  Be very careful your cutting is straight and 3 inches.  If not your block will not end up square and corners won't match.


Next cut 8 inch strips, from only your light fabric, then sub-cut them into 8 inch squares.  You will need 18 plain light squares for the lap size quilt.


Now start sewing your 3 inch strips together along the long edges, light to dark.


Make sure your seems are just 2 or 3 threads less than a 1/4 inch.  This is important again so that your blocks come out the right size and fit together easily.


Add another dark strip on the opposite side of two of these original strip sets.


And add a light strip on the opposite side of two of the original strips.


Press all seems to the dark side ( I had a quilt instructor once called it Darth Vader ironing).
Cut the long sets into smaller strips exactly 3 inches wide.


You will need 34 of these:

You will need 17 of these:


Now sew them together so they look like this:
You should have 17 of these. They are called 9 patch blocks.

Now you will begin to sew the solid squares to the nine patch blocks so you have 4 long strips that look like this:
Note this strip begins and ends with a solid block.


Next sew 3 long strips that look like this:


This strip begins and ends with a 9 patch block.


Next sew your long strips together so they look like this:

You can see that I started and ended with the strip that has the solid square first.


You have made a quilt top, and all in one afternoon.

Some notes to consider...
I will be adding a border to my top to make it look more finished and to be a little bigger.  I am going to use a medium green for this.  Also you can switch the light and dark values in your quilt as I did in the blue one shown at first.  It is very nice as well.  You may also note that in the blue quilt, my light color was a very large print.  Don't be afraid to use large prints in quilts, especially simple ones such as Irish Chain or trip around the world.  Large prints can give a nice lacy effect to the blocks.  I think the important thing in picking out fabrics for an Irish Chain is that you have good contrast between your fabrics no matter from what part of the color wheel you pick.  Happy quilting.

www.reeskesworld.com